Adobe Photoshop Tutorials, Tips and Tricks
|
||||||||||||
Create a Starry Night SkyFor this Photoshop lesson, we will learn how to create a starry night sky that looks like it might have been painted by hand. As usual, no artist skills are required as we'll let Photoshop do most of the work for us, and so this free tutorial is easy enough for ameteurs but the end result is convincing enough that professionals can find it useful as well. The starry night sky we will learn how to create here is ideal for use as background images to enhance other artwork or photographs anytime a view of space with stars is desired. It's great for any kind of fantasy world or science fiction type projects. Here's a look at what our final product will look like:
|
| |||||||||||
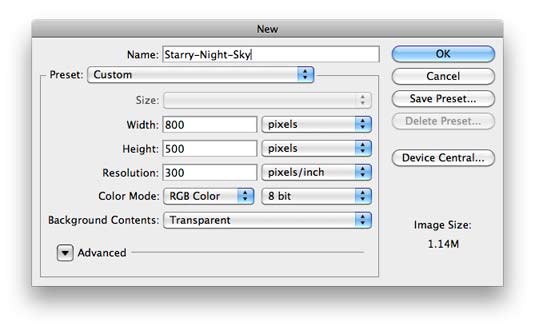
1We'll need a new blank canvas to start in, so choose File > New. Choose the size you want. I chose 800x500 for this example (the background contents don't matter):
2Next we'll let Photoshop fill in some of the background for us. The color of a night sky when viewed from earth isn't uniformly black. There are lighter and darker areas that correspond to things such as the sprial arms of the milky way galaxy and there are other phenominom that add color to the night sky. We'll create this look in Photoshop and take a little artistic license by enhancing this effect a bit. Start by setting the background color to a dark shade of navy blue and set the foreground color to a somewhat lighter shade of blue (but not too light). I used color #19143f for the background and color #131b64 for the foreground. Now choose Filter > Render > Clouds to get started with the background. You'll get something that looks way too bright for a night sky, but don't worry, we'll fix that. Select Filter > Render > Difference Clouds and you'll see that the image immediately darkens down. It will most likely be too dark now, but that's OK. We'll apply the Difference Clouds filter a few more times on top of this until we get the look we want. The shortcut to reapply the most recently used filter is command-F (or control-F on Windows). Do this a few times and you'll see the image alternates between lighter and darker versions. Reapply the filter a few more times until you get a dark version with a nice subtle looking pattern to the lighter areas. The lighter areas shouldn't be too light but should suggest the random structure of nebula or an arm of the milky way. If after applying the Difference Clouds a number of times (like 10 or more) and you're still not getting the look you want, then simply start over by rendering Clouds to wipe the canvas clean and then using the Difference Clouds again. Here's the background I got after applying the Difference Clouds 4 times. Since both Clouds and Difference Clouds use randomized algorithms, the version you get won't look exactly like this, but you should have something similar:
The important thing at this point is that the image is mostly dark to represent the emptiness of space and that the lighter areas should be subtle. We'll accenuate some of these next to create a more striking look. 3
|
||||||||||||
X |
|
|||||||||||
|
|
||||||||||||
X |
||||||||||||
Thanks for visiting with the Photoshop Dragon.
Copyright © 2007-2010 Curt Schimmel. The contents of this web site may not be copied in any way without permission. Terms of Use and Privacy Policy. |